(Blog author's note on January 25, 2013: After working with more sleeves, I realize that--although doll clothes differ from people clothes--my sleeve problem is in the design of the pattern and not in the skill of my sewing. But I will eventually post some easy sleeve patterns to clear up the nonsense for good.)
I am befuddled when it comes to setting in sleeves for my American Girl doll. I have approached sewing with confidence and patience. I will remove stitches with a seam ripper and stitch again, if I must.
I wish I had photos of the many garments that I've made for myself. When I was in high school my mother took my aunts through my closet while bragging about my accomplishments. I merely boast to provide perspective here because. . . .
I don't seem to be able to set in a sleeve for my dolls. I have succeeded a couple of times, but these were by hit and miss. I've spent so long trying to master the sleeve that I'm close to throwing my sewing machines and Sergers out the window (the visual is somewhat satisfying).
Here is my problem: I do not want tucks in my sleeves. Gathered, full sleeves are another matter, but a jacket or casual dress or blouse should be smooth where the sleeve joins the armhole.
I just praised the book Dressing up 18" Dolly by Lorine Mason in my last blog entry. She gives practical instructions about most sewing, addressing the neatness of the inside of the garment. For instance, she uses a lot of bias tape to finish hems. She also suggests using a different color bobbin thread when making gathers in fabric (for a skirt or a sleeve). The color difference makes pulling on thread together much easier. Removing these temporary threads is easier as well.
I was hoping that Lorine Mason could clear up the mystery of mastering the set-in sleeve, but alas. I'm more confused that ever. Her sleeve patterns are too big for the bodice. I cannot connect them without unwanted tucks and gathers.
To be honest, I notice gathers in some of the photos of her completed garments (she uses the same sleeve pattern for each garment in the above-mentioned book). But other sleeves look perfect. I've almost finished her Cropped Jacket. I need to attach the finished sleeves and the bottom ruffle, and that's it. But I've made several attempts to sew the sleeves to the bodice, and I'm just not happy. I was once an expert sewer or seamstress--or sewest--but I feel like I'm treading water.
I've found some great advice at Adams-Harris.com, a beautiful clothes pattern designer (for BJD size). After addressing the challenge of setting in sleeves of doll clothes, she often prefers to attach her sleeves by hand.
I don't know whether to finish my current project with another attempt to put the sleeve in by hand or whether that method will work with this particular pattern. I wish Lorine Mason--or other doll clothes creators, for that matter--addressed the sleeve issue in their directions. If I didn't have so much other sewing experience, I'd probably quit making doll clothes all together, thinking I simply had no sewing talent or potential.
Once I find a sleeve that works for me, I may hold on to that particular shape for everything with sleeves (nothing of course the size of the arm hole). I will continue to make notations in this blog about my relationship with set-in sleeves.
Showing posts with label 18-inch dolls. Show all posts
Showing posts with label 18-inch dolls. Show all posts
January 15, 2013
January 11, 2013
Give Your Doll Clothes a Professional Look
(Update January 19, 2013: I still love the designs in this book. However, I made--or attempted to make--the Cropped Jack, and the sleeve was too big to set in without gathers or puckers in the sleeve seam line. Although I admit to finding set-in sleeves a challenging part of doll clothes making, I've been able to put other sleeves in. I certainly have no trouble with sleeves of my own garments. I visited the author's website and left her a note. No response yet.)
~~~~~~~~~~~~~~~~~~~~~~
I love this book!

I will tell you why:
I have sewn everything from coats and suits to prom dresses. But sewing for an 18-inch doll is simply another matter. Although I have many cute ideas for doll clothes, I have found myself disappointed in my results.
Most written instructions do not take in to account the significance of the 1/4-inch seam, as opposed to the usual 5/8-inch seam that is used in patterns for people. There is less room for error with the smaller seam; the finished garment will be too snug if the seam is too big or the fabric can easily ravel to the seam line if the seam is too narrow.
Making doll clothes look neat on the inside is important, especially if you're selling them. I've had to change the way I think about seams after years of pressing them opened to get the garment smooth and flat. Most of my seams now face one direction, and I finish seams whenever possible.
I don't think that Simplicity, the best-known pattern company, accounts for the differences between people and dolls. It is difficult for me to turn a hem under just once--per Simplicity's instructions--because the raw edge looks unfinished underneath, especially with fabric that ravels.
Dressing up 18" Dolly has practical instructions for sewing doll clothes. One suggestion, for instance, is to finish the edges of some seams before joining the two sides together. This is a small book with some super cute patterns, and I will give more concrete examples after making one of the patterns myself.
A couple criticisms of the book: The photos taken of the doll clothes could be much better. Also, I prefer American Girl or Madame Alexander as doll clothes models. Springfield dolls are cheaply made, and they look like cheap dolls. Would I buy my child a Springfield doll? Yes. But the doll doesn't photograph as well.
January 8, 2013
Reviewing My Sewing Machines
I just added a new toy to my sewing machine arsenal, a Singer 9960 Quantum Stylist.

I'm trying NOT to spend money, but here was my quandary: My normally dependable and lovely machine is a Kenmore 19606. Although I've always wanted a Bernina or a Viking, I've been too practical to go for the top-of-the-line anything. I've used Kenmore machines since I bought my first one at age 18.
The 19606 is my best Kenmore to date, but after awhile it developed a small but significant problem. The bobbin winder quit working. Before I realized that I could buy a portable bobbin winder or previously threaded bobbins, I took my machine to Sears to have it repaired. Sears sends all sewing machines to a special place, and getting it back requires patience and time.
By the way, I knew exactly what was wrong with the machine and what part I needed, but taking the machine apart was far too risky. I included a diagram with the machine, showing Sears exactly what was wrong, but Sears gives no discount for my research. When I got the machine back, the bobbin threader winder worked but the machine's perfect stitch had been altered when it was cleaned.
Unfortunately, I put my machine away for awhile. When I used it months later, I realized that although the bobbin winder worked, it would only fill the bobbin 1/3 of the way before sticking.
At this point I bought a bobbin winder. I also bought several filled bobbins with either black or white thread. Don't do this. After years of sewing I recently realized that having the same weight thread on the top and the bottom is essential for a perfect sewing stitch.
When I decided to become a serious doll clothes designer, I bought a Serger. I like to finish the seams properly in anything that I make, and using a regular zig-zag stitch adds bulk to the seams. First, I bought a Brother Serger 1034D that is a lovely machine but difficult to thread. The instruction booklet and the accompanying DVDs were limited. I eventually threaded it by finding some instructions on YouTube. But even with instructions, threading the machine was a pain in the behind. Since I'd always gotten by with conservative machines, I finally splurged and purchased a Baby Locke Imagine. This Serger threads itself, and it's easy to use.
I take that back:
January 2, 2013
Girls Just Want a Fun Hat
Note to self: Do not make this dress pattern again. In fact, toss it into the garbage. My model below looks as cute as a button. I saved her "look" by giving her a hat.

This hat is a strip of velvet knit, folded in half (right sides together) so that the fabric becomes a thinner strip with the ends cut diagonally. I stitched the fabric together on the long edge, leaving an opening in the center, large enough to turn the strip right-side out. I folded this thick velvet strip into four pleats and tacked the pleats together. I gathered a piece of netting down the middle and tacked it onto the velvet. I added a flower, and voila! I attached the hat to the doll's head with a hat pin.
When I make a new outfit, I try it on all my dolls to see which one looks the best. Any black in the fabric looks best with black hair--or blonde hair. Not brown. I have plenty of beautiful shades of browns and tans for my brown-haired dolls.
Here's a full shot of the dress, Simplicity 4654. This dress was supposed to be a holiday dress. I'd planned to add a beautiful black sash and bow, but the bodice is far too loose at the seam line under the chest.

I previously made this same pattern in an October 14, 2011, blog entry. I remember thinking that perhaps I'd stretched the fabric. But I was careful this time. The bodice might be loose to ease the fit of the set-in sleeves.
Setting in a woman's or child's sleeve is easy. You put a row of basting stitch on the stitch line and ease the sleeve fullness into the bodice without making an ugly tuck in the sleeve. With doll sleeves, it's easy to make an unwanted tuck in the under-arm area of the bodice. I notice that most of the sleeves of the eight-inch Madame Alexander costumes are very full and gathered. These full sleeves are probably easier to sew.
Any suggestion for perfecting the setting in of doll clothes sleeves would be appreciated.

This hat is a strip of velvet knit, folded in half (right sides together) so that the fabric becomes a thinner strip with the ends cut diagonally. I stitched the fabric together on the long edge, leaving an opening in the center, large enough to turn the strip right-side out. I folded this thick velvet strip into four pleats and tacked the pleats together. I gathered a piece of netting down the middle and tacked it onto the velvet. I added a flower, and voila! I attached the hat to the doll's head with a hat pin.
When I make a new outfit, I try it on all my dolls to see which one looks the best. Any black in the fabric looks best with black hair--or blonde hair. Not brown. I have plenty of beautiful shades of browns and tans for my brown-haired dolls.
Here's a full shot of the dress, Simplicity 4654. This dress was supposed to be a holiday dress. I'd planned to add a beautiful black sash and bow, but the bodice is far too loose at the seam line under the chest.

Setting in a woman's or child's sleeve is easy. You put a row of basting stitch on the stitch line and ease the sleeve fullness into the bodice without making an ugly tuck in the sleeve. With doll sleeves, it's easy to make an unwanted tuck in the under-arm area of the bodice. I notice that most of the sleeves of the eight-inch Madame Alexander costumes are very full and gathered. These full sleeves are probably easier to sew.
Any suggestion for perfecting the setting in of doll clothes sleeves would be appreciated.
December 20, 2012
Dress for the Holidays
Here's another dress with holiday colors. I started with Simplicity 7083 but made several changes.

I used my own straight skirt but added just enough gathers so the doll could pull the dress over her hips to get into it. In other words, I wanted a fitted skirt without adding darts, so I put gathers in the back of the dress.
I think I got this dress a bit too short. I've been experimenting with fit and hem length. These dolls have weird proportions to start with. The length from the waist to the middle of the knee is about 5-1/2 inches, but from the crotch to the knee is less than 3 inches. When a doll skirt is too long it doesn't look stylish unless it's a gown. But a cut above the knee may reveal the doll's undies.
As in the previous blog entry, I love combining two different prints.
December 19, 2012
Winter Fashion Line
Here's my first holiday dress of 2012. I'll eventually have Christmas dresses for all my dolls--and maybe some of yours.

I've embellished Simplicity #4364. I like the way the bodice fits, but I shortened the skirt quite a bit, and I added these polka dotted inlays. I actually made a beautiful white shrug to go over the dress, but the shade of the shrug made me realize that this white background here is not truly white. The shrug doesn't match, but look out. The shrug will be featured shortly.
Here's a full view that shows these adorable party socks and shoes.

I've finally got my mojo working, and I have so many ideas for doll clothes. I hope to have some patterns available in the next few months.
September 14, 2012
My Red-Haired Harmony Club Doll

May 9, 2012
Still a Learning Blog
This blog entry continues the coat story from my last entry. This coat has been an exercise in patience. But hopefully I've learned something that will benefit me.
Many people say they don't have the patience for sewing. My mother taught me how to use a seam ripper almost immediately. A seam ripper makes it possible to remove stitches without ripping the whole seam--usually. A good seamstress must be willing to remove stitches and start again. A good seamstress should try to make something out of a big mess when necessary.
I decided to line the red velvet coat pictured in the previous blog. Lining a doll coat is on the silly side; who cares if the coat is lined? Certainly the doll doesn't. Certainly my five-year-old granddaughter doesn't. My idea was to have Christmas outfits for all my 18-inch dolls, and I could eventually sell the coat on eBay if I wanted to trade the time I spent for a few dollars.
Once I found a shade of red or maroon that slightly matched the red velvet, I put together the lining rather quickly. I used the coat pattern, and whileI began to tack the lining into the inside of the coat, I trimmed the lining to fit the inside. I thought this was a full proof method that would allow me to make adjustments if needed. Unfortunately, the lining didn't improve the way the velvet hung; it made it worse. See the following photo:

I don't like the way the velvet puckers down the front, and I didn't want to tack the facings to the velvet itself. I'd hoped that the lining would somehow make the inside smoother. But it did not. In addition, the ripple of the side seams might be an odd feature of the velvet, but I think my lining is a bit too long. As I contemplated shortening the lining--after spending way too much time on this coat--I discovered a hole under the arm in the sleeve seam where the fabric had unraveled.
If I do post another photo of this coat, I will have found a safe way to set it on fire without burning down my house.
My doll clothes pattern business is off to a slow start. I hope I've learned something from this time-consuming experiment:
Many people say they don't have the patience for sewing. My mother taught me how to use a seam ripper almost immediately. A seam ripper makes it possible to remove stitches without ripping the whole seam--usually. A good seamstress must be willing to remove stitches and start again. A good seamstress should try to make something out of a big mess when necessary.
I decided to line the red velvet coat pictured in the previous blog. Lining a doll coat is on the silly side; who cares if the coat is lined? Certainly the doll doesn't. Certainly my five-year-old granddaughter doesn't. My idea was to have Christmas outfits for all my 18-inch dolls, and I could eventually sell the coat on eBay if I wanted to trade the time I spent for a few dollars.
Once I found a shade of red or maroon that slightly matched the red velvet, I put together the lining rather quickly. I used the coat pattern, and whileI began to tack the lining into the inside of the coat, I trimmed the lining to fit the inside. I thought this was a full proof method that would allow me to make adjustments if needed. Unfortunately, the lining didn't improve the way the velvet hung; it made it worse. See the following photo:

If I do post another photo of this coat, I will have found a safe way to set it on fire without burning down my house.
My doll clothes pattern business is off to a slow start. I hope I've learned something from this time-consuming experiment:
- Don't work with velvet unless the pattern is very simple;
- Keep set-in sleeves--when working with small armholes--to a minimum.
- Keep patterns simple in general--at least until I develop some kind of rhythm in my sewing and work habits.
I promise to feature some doll clothes worth sharing very soon.
October 14, 2011
Fashionista in Polka Dots
I put the finishing touches on the dress that I featured in my last blog. I shortened the dress considerably, and I added some off-white lace to the bottom.
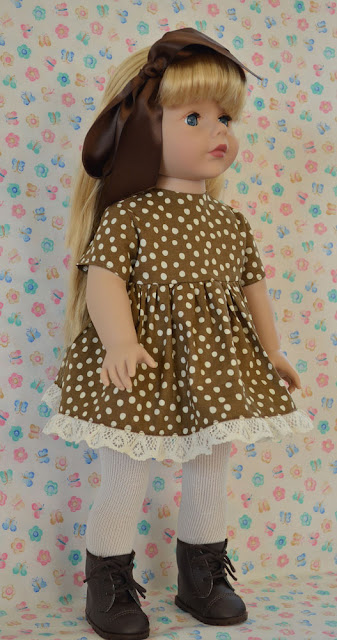
In addition to altering the length, I changed the shoes to dark brown boots, and I added wide brown ribbon to Dollie's hair. Maybe I missed my calling as a "stylist." Compare our model to the one in the previous blog. Comments?

In addition to altering the length, I changed the shoes to dark brown boots, and I added wide brown ribbon to Dollie's hair. Maybe I missed my calling as a "stylist." Compare our model to the one in the previous blog. Comments?
August 6, 2011
My Asian Fashionista
Whenever I consider buying a new doll, I must find a place to keep her. 18-inch dolls take up space. Until recently I had one American Girl doll (Julie), and I had four Madame Alexander dolls. I need to balance out my collection with another A.G. doll, maybe one with red hair and freckles, or I'd like to buy an A.G. doll that looks like me, "Marshmallow Jane."
Lo and behold, I found another Madame Alexander doll that I couldn't resist and she is Asian. Or she looks partly Asian. Eurasian. Chinese American or Japanese American.

At least a manufacturer made an attempt to create a doll that looks somewhat Asian, and I say this because at least two people don't think she looks Asian at all. She is beautiful; there is no doubt about that.
I peek in the doll section everywhere I go. I almost hate to say this, but I only spent $20 on the above beauty that I found at Walmart. She doesn't appear anywhere on the Internet. Madame Alexander manufactures batches of dolls for specific stores--it would seem--and then they disappear. I could tell you that I spent $100 on her; the quality of her face and hair certainly compares to the expensive A.G. dolls.
Now I have one A.G. doll and five M.A. dolls. I actually prefer the construction of American Girl's body a bit more, and I will make sure that my future clothes patterns fit her to a tee. But nothing compares to the Madame Alexander face.
My sister's friend Win, who is at least in part Chinese, thinks this doll looks Asian. Of course, I'm using the word "Asian" to cover all Asian races. I hope that no one Chinese, Japanese, Vietnamese, Korean or other specific race is insulted by my generalization. At least a company has made an attempt to alter the face--if only slightly--to represent a girl who isn't all white--or black.
Comments, please?
June 15, 2011
My 18-inch Dolls
American Girl manufactures the most popular 18-inch doll. In my opinion their construction is superior to that of other dolls of the same size, but they are pricey at $100 each. When purchasing an A.G. doll, you can choose hair color, hair length, shade of skin and eye color. Your little girl can play with a doll that resembles her in many important ways.
I own one American Girl doll that is known as Julie. She's the center doll below with the long blonde braid, and she represents the 1970s when flower power and love influenced both style and ideals. The fictional "Julie" lives in San Francisco. The embroidered blouse that her friend wears belongs to Julie.

I prefer the face of Madame Alexander hands down. M.A. dolls have larger eyes and fuller lips than American Girl. Although I will always create patterns and clothes to fit the measurements of the popular A.G. doll, I will make it easy to adjust clothes to fit Madame Alexander. I will talk about the differences in sizes at a later date.
Although I simply adore M.A., I have noticed that the construction in general of American Girl is superior. Her hair has more root holes, so it is thicker, and her body has better proportions.
Below are two dolls by Madame of Alexander that I simply adore. I call the doll on the left "Brandi" because she resembles my daughter-in-law with the same name who is also bi-racial. Recently, Madame Alexander has manufactured its 18-inch dolls in small batches of unique dolls. The doll on the right is quite a find. Look at her full lips and massive hair. I can't wait to sew for these dolls!

The dolls I include in this blog have traded some articles of clothing. I threw away some clothes that came in the box because they were utt-bugly. By the way, I am not a lover of the clothes that are available for these dolls, and that's what this blog is all about. I want to try something different. I can't wait to do some wild things with the doll hair as well.
Stay tuned for more info about dressing 18-inch dolls and the people who love them.
June 9, 2011
Ballerina and Fairy Dolls
The Madame Alexander 10-inch doll has the most exquisite face. Once I fell in love with her, Barbie made no sense. I remember Madame Alexander in costumes from various countries, but through the years, the 10-inch doll has appeared as Scarlett O'Hara, Jackie Kennedy and other historical figures.
I found my own dolls under the Christmas tree, one at a time, without a fancy outfit. As I recall, my doll either came in underwear or a generic dress which made her a great candidate for homemade clothes. In those days, I wasn't much of a collector, and with five children in our family, my dolls eventually lost their heads.
As an adult, I've gravitated to the same beautiful face of the 10-inch Madame Alexander Doll. She no longer is available in her skivvies so through the years I've bought them in their costumes. I have two Scarletts, and a Pollyanna but I lean toward ballerinas.
I'm actually in awe of this doll. I want to look at her, stare at her, but I must keep her tucked away to protect her from dust. One of these days I may get a display case. This doll is called "Fairy of Wind."

Here are two dancers called: "Russian Ballerina" and "Polka Dot Plié." I love the detail on these costumes. The dancer on the left is a prima ballerina who has received flowers after her performance.

Here is Madame Alexander's version of "Tinker Bell." If you look closely, you can see her wings and her wand.

Although I adore these dolls, they are far too fancy to play with, and I want to work with dolls that my granddaughter can carry with her everywhere she goes. I will dress larger dolls--larger than the 10-inch dolls of my past--so that a set-in sleeve or lapel collar is do-able. I now love the 18-inch doll manufactured by both American Girl and Madame Alexander. I will discuss the differences among dolls of this size as I begin dressing them.
I wanted to share my first love of dolls before embarking on this project to dress the larger American Girl and her Madame Alexander sisters.
May 24, 2011
Fashion and Dolls
When I was a little girl, I had a sewing machine that was probably considered a toy. The machine was designed like the real thing except that it had no foot pedal or knee attachment. I manually turned the wheel that made the needle go up and down.
My dolls were pre-Barbie. I owned a couple beautiful 10-inch Madame Alexander dolls. In those days, Madame Alexander sold some of the dolls without luxurious costumes. They came in the box wearing something plain. At first my mother made outfits for my dolls, but in no time I was making my own doll clothes.
My granddaughter is almost five, and I recently got the bug to make doll clothes again. My first recent foray into doll fashion was to make a little girl dress with a matching doll dress. I flipped through books and perused the Internet, trying to find patterns that matched, and I eventually found dresses that were only similar. I made them match by adding some flowers and ribbon to my granddaughter's dress and purse and to Ariel's dress.
I was disappointed that the doll clothes pattern I used was way too big for Ariel. I ended up scrapping the pattern and making something from scratch.

Since that experiment, I've learned that the 18-inch doll is the most popular. American Girl has demonstrated longevity. Madame Alexander and a few other companies make an 18-inch doll with similar measurements. I find sewing for this size doll to be more fun. The larger doll allows for more detail.
My long-term goal is to make fashionable clothes for my granddaughter's 18-inch dolls, and, hopefully, I'll find an easy way to make matching clothes for little girl and doll. I've searched the Internet to see what doll patterns are available. American Girl manufactures beautiful clothing and accessories for the 18-inch doll that are pricey. Butterick, McCalls and Simplicity carry some cute patterns, but I have something else in mind.
I want to create some doll clothes that are trendy, modern, creative, funky, maybe a bit freaky. Not sexy. These are little girl dolls that can become well-dressed. Why not? Although period costumes can be adorable, I think that little girls like to dress their dolls the way they dress themselves.
I gather ideas from the likes of Teen Vogue and Seventeen. My aim is to create "looks" so these dolls can walk the runway. Dolls. Fashion. Patterns. Little girls.
Welcome to my blog about doll fashion and sewing for dolls.
May 23, 2011
This blog will change my life
I look forward to making this blog beautiful. Stay tuned for some stylish funky doll clothes patterns.


Subscribe to:
Posts (Atom)